Hardware Diagnostics and Power on Self Tests
Most Embedded Systems run hardware diagnostics to check the health of the hardware. Diagnostics are also used to confirm a fault that might have been detected during normal operations. In this article we will be covering different type of diagnostic tests that are run in an operational Embedded System. These tests are summarized below:
Power On Self Tests (POST)
As the name suggests, Power On Self Tests (POST) are run just after a board powers up. These tests run diagnostics on the hardware components on the board. Typically code for these tests resides in the EPROM that boots the card. When the EPROM boots, these tests are triggered automatically.
The main limitation of these tests is that they can only test internal functioning of the card. External interface logic of the card will not be tested by the Power On Self Tests.
CPU and Register Test
CPU test is one of the first tests in POST. This test checks the internal working of the CPU. This test is run by executing processor instructions and then verifying the output of the instruction. All the processor registers are also exercised in this test. For example, as a part of this test, data contained in a register might be shifted by one bit and the result of the shift operation will be compared with a pre-computed value.
Interrupt and Exception Test
This test checks the interrupt and exception processing of the processor. The test is run by creating interrupt and exception conditions and then looping until the expected interrupt is recognized. For example, a timer interrupt might be enabled and the test checks a flag that would be set by the interrupt handler. Exception tests are carried out by deliberately creating exception conditions like "divide by zero" and then verifying that control has been transferred to the appropriate handler.
EPROM Checksum Test
When an EPROM is programmed, the last two bytes in the EPROM are deliberately initialized to zero. When the EPROM programmer computes the checksum, the computed checksum is fused into the last two bytes.
This test calculates the checksum for the EPROM by computing a 16-bit Exclusive OR (XOR) of the EPROM contents, excluding the last two bytes. The calculated checksum is then compared with the checksum that was fused in the last two bytes. Test passes if the computed and the fused checksum match.
RAM March Test
RAM March Test is run to test the integrity of the read-write memory on the board. The test focuses on catching three types of problems with memory:
- Address Line Faults: The address lines on the board or inside the memory chip might be shorting with each other or they might be stuck to 0 or 1. In either case, when memory is written, multiple locations or a wrong location might get written. A read might result in data corruption when two different locations in the memory output data on the data bus.
- Data Line Faults: The data lines on the board or inside the memory chip might be shorting with each other or they might be stuck to 0 and 1. This condition will result in wrong data being written or read from the memory.
- Data Loss: Data written to a particular location might be fine when read just after writing, but it is lost a little while later. Here the address and data lines are fine but the memory cells get corrupted over time.
Memory testing techniques can get fairly complicated and the actual algorithm used also depends on the layout of the memory banks. We will be covering a simple test that does a pretty good job of testing the fault scenarios mentioned above. The RAM March test is carried out in by executing the following steps:
- Initializing: Write a 0 in all memory locations on the board.
- Marching Ones: Repeat the following steps starting from the lowest address
until the
highest address is reached:
- Check if the content of the memory the zero
- Write a 1 in the bit 0 position
- Read the memory location to confirm that the bit has been written successfully.
- Repeat the above steps until a 1 has been written in all bits of that location
- Marching Zeros: Repeat the following steps starting from the
highest address until the lowest address is reached:
- Check if the content of the memory the 0xFF (i.e. all bits are still set as one after the one march)
- Write a 0 in the bit 0 position
- Read the memory location to confirm that the bit has been written successfully.
- Repeat the above steps until a 0 has been written in all bits of that location
DMA Controller Test
Direct Memory Access Controllers (DMA controllers) are present on almost all boards. The DMA operations are required to transfer data to and from peripheral devices without involving the processor. The DMA operations on the board can be simply checked by initiating a DMA transfer and then verifying that the source and destination memory areas match after DMA has been completed.
Device Tests
Peripheral devices used on a board need to be tested during the self tests. These tests are very specific to the device being tested. Many vendors implement special support for device tests by providing a test mode of operation. The device is programmed into the test mode to perform these tests. When a device does not support a test mode operations, board designers provide extra functionality on the board to test the peripheral devices.
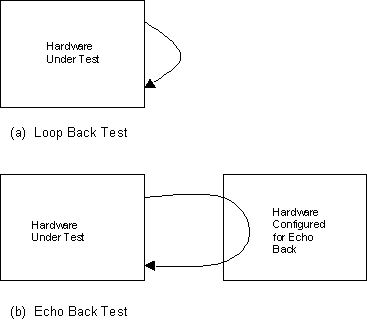
Loop Back Test
Loop Back tests can be performed by connecting the transmitter on the device to the receiver on the same device. This is achieved by programming the device into loop back mode. Once the device has been programmed, the test transmits the data and waits until the receiver receives the data after loop back. The main advantage of this test is that it can be carried out independently on the board under test. But many times the loop back test does not test out the transmit and interface data paths, as the loop back has been performed within the chip. We will be covering Echo Back Tests which address this problem.
Out of Service Tests
We have covered Power On Self Tests in the previous section. POST tests can test out the internal working of the board quite well. But these tests fall short when it comes to testing the interfaces with other boards in the system. In this section we will cover tests that are run in an active system by bringing the board to be tested out of service and then verifying its interfaces with neighboring boards.
Interface Tests
Interface tests are a broad category of tests that are performed to test out interfaces with other cards. These tests generally involve participation from the neighboring cards. Basic steps in interface tests are listed below:
- Bring the card to be tested out of service.
- Configure the neighboring cards to work in an interface test mode. (In some cases this might require bringing the neighboring cards out of service).
- Instruct the card under test to perform the test.
- Restore the configuration on the neighboring cards by bringing them out of interface test mode.
Echo Back Test
The main disadvantage of the Loop Back Test was that it does not test out the hardware logic at the transmitter and receiver interfaces. This problem can be solved by performing the Echo Back Test. Here the interfacing card is configured in echo back mode, i.e. the interfacing receives the data and echoes it back by transmitting it to the card under test. Thus the card under test receives back the data that it had transmitted. The important difference from the loop back mode is that this is now testing the transmit and receive driver logic. The picture shown below points out this difference between loop back and echo back.
Note that echo back is a special case of Interface Tests. Thus it follows the same sequence of operations:
- Bring the card to be tested out of service.
- Configure the interfacing card to echo back all the data it receives.
- Instruct the card under test to perform a loop back test.
- Restore the configuration on the interfacing card by bringing it out of echo back.
In- Service Monitoring
We have considered running diagnostic tests at power on and in out of service mode. Here we will be discussing techniques to check the health of the card when the card is in service.
Transient Error Monitoring
When a card is in service, it should keep track of transient errors that might be detected by the software. Transient errors are errors that occur occasionally even when the hardware is functioning normally. These errors are transient, so if the failed operation is attempted again, the operation would succeed. In a healthy system such problems are caused by power glitches, spikes and interference from other cards.
A good example of transient errors is spurious interrupts. Spurious interrupt condition is detected when processor detects an interrupt but the interrupt handler does not find a device that had initiated the interrupt. In such cases a leaky bucket error counter is incremented. If spurious interrupts become too frequent, the leaky bucket counter will overflow. When the counter overflows, the system should trigger complete hardware diagnostics to isolate the problem.
Link Monitoring
List monitoring is also a very important tool for in- service monitoring of a card. Monitoring the bit error rate on the links can give advance warning about the health of the system. When the bit error rate exceeds a certain threshold, diagnostics might have to be triggered.